The Great Himalayan Trail (GHT) Guide and Porter Cost 45$
The Great Himalayan Trail (GHT) Guide and Porter Cost
The Great Himalayan Trail (GHT) is a long, remote, and logistically complex trek, so guide and porter costs are usually higher than standard treks like Everest or Annapurna—especially in remote sections (Dolpo, Makalu, Kanchenjunga, etc.). The Great Himalayan Trail (GHT) Guide and Porter Cost starts from 40$ Per day for Guide and for Porter it cost 30$ per day. The Great Himalayan Trail (GHT) cost is 45000$ in Package.And the cost includes all the Trekking Permit, Meals, Staffs, Camping equipment, All the Transport and flight cost etc.
The Great Himalayan Trail (GHT) Guide and Porter Cost
GHT Guide & Porter/Porterguide Cost (2026)
1. Daily Cost (Standard GHT Range)
Guide Cost The Great Himalayan Trail
50$ per day (remote sections: higher)
Fully supported GHT (including food/logistics/insurance and Salary):
But his Transport cost is extra and it is requested to client for payment.
Days count from Kathmandu to Kathmandu.
Porter Cost for The Great Himalayan Trail
35$ per day
Fully supported GHT (including food/logistics/insurance and Salary):
But his Transport cost is extra and it is requested to client for payment.
Days count from Kathmandu to Kathmandu.
1 porter = 2 trekkers (20–25 kg load)
Porterguide Cost for The Great Himalayan Trail
55$ per day
Fully supported GHT (including food/logistics/insurance and Salary):
But his Transport cost is extra and it is requested to client for payment.
Days count from Kathmandu to Kathmandu.
1 Porterguide will carry your luggage (10 kg load)
Porterguide means 50% guide and 50% Porter
Total Timeline Itinerary Summary for the GHT
Section
Duration
Eastern Nepal
20–25 days
Makalu
15–20 days
Everest
15–20 days
Rolwaling–Langtang
20–25 days
Manaslu–Annapurna
25–30 days
Mustang–Dolpo
30–35 days
Rara–Humla
20–25 days
Total
140–155 days
The Great Himalayan Trail (GHT) Itinerary 54 days
Day 01: Kathmandu airport(arrival)-Transfer to Hotel
Enjoy Nepal Treks Staffs will come to Airport for your arrival in Kathmandu then you will drive to hotel and you will have welcome dinner in the evening at Nepali culture restaurant with your Trekking Guide.
Included: Welcome Dinner
Altitude: 1350m.
Day 02: Kathmandu-Bhadrapur-Taplejung 1820m.
After Breakfast you drive to Kathmandu Tribhuwan domestic Airport and fly to (Chandragadhi Airport) Bhadrapur 45/50 minutes around drive to Taplejung 8/9 hours, 243.9 km(151.6 miles) by Local Reserve Jeep through the Kanyam Illam Mechi highway Road and on the way you will see, small cities, Illam Bazar, River Valleys, Terraced hills, Cultivation, beautiful Tea Garden and delightful landscape.
-Kathmandu (Ktm) to Bhadrapur (BDP) flight: Bddha, Yeti and Shree Airlines (7:00 am to 3:00 pm)
-Flight offer an eye catching view of Mt. Kanchenjunga, Makalu, Lhotse and Everest.
-Driving Road Surface info: mainly paved and partly rough.
-Network connectivity: Local SIM Ncell and NTC work generally.
-Bhadrapur to Taplejung Vehicles info: Local Bus 6 am to 8 am drive and Local Reserve Jeep anytime.
-Highlight Bazar: Ilam Bazar, Phikal Bazar and Taplejung Bazar.
Flight KTM-BDP (45-50 Minutes)
Bhadrapur to Taplejung driving time: 8-9 hours
Overnight: at Lodge
Includes: Breakfast/lunch/Dinner
Day 03: Taplejung 1820m.-Lamatar 2200m.
After Breakfast you will drive to sekathum 5/6 hours and 40 km around along the small Villages, Valley of Tamor River, Mitlung and Lelep. The driving Road condition is mostly dirt and gravel. You drive by Local Jeep, while driving on the way you will see cardamom farms and some Rhododendron Forest. After arriving at Kekathum, you will start to walk. From Sekathum to Lamatar you will walk 2 hours around where you overnight.
Taplejung to Sekathum driving time: 5/6 hours (Dirt/Gravel Road)
Sekathum to Lamatar Walking time: 2 hours/10km around.
Overnight: at simple Lodge where you get 2 tea houses.
Includes: Breakfast/lunch/Dinner
Day 04: Lamatar 2700m.-Gyabla 2730m.
You walk today from Lamatar to Amjisola 2 hours around and walk further ¾ hours to Gyabla 14km around. You walk today through the Amjisola moderate steady ups 30m+ and forest with down Rocky paths. Today you will cross Tamor River, walk along the Pine and Rhododendron forest, you will enjoy the Vistas of Kanchenjunga. You will chance to see Red Panda but it depends on your luck and Waterfalls.
Walking time: 5/6 hours (14km) around
Overnight: at simple Lodge
Includes: Breakfast/lunch/Dinner
Day 05: Gyabla 2730m-Ghunsa 3415m.
You walk today from Gyabla to Ghunsa 5/6 hours which is 11km around. You will walk through the lush Rhododendron forests and Bamboo by crossing suspension bridges. Besides you will see small waterfalls while walking on the way to Ghunsa and Old Tibetan refugee settlement. Therefore you will see Tibetan traditional stone, player wheels, Prayer flag and houses. Also you will have chance to see Pheasant and musk deer literally in the early morning and in the late afternoon. You get at Ghunsa, Shower, Small clinic or Heath Post and Police station.
Walking time: 5/6 hours (11km) around 685m+
Overnight: at simple Lodge
Includes: Breakfast/lunch/Dinner
Day 06: Ghunsa 3415m-Khambachen 4145m.
You walk today from Ghunsa to Khambachen 5/6 hours which is 11 km (635m+ and 200m-) around. You will pass Sherpa Village, Gompas, Mani Walls before entering the Rhododendron forest and you will cross the small bridges over the Ghunsa River. You will have chance to hear chirping Pleasants and you will see grazing yaks spots. Besides you will see glorious view of Janu Himal (Kumbhakarna 7710m). You will walk 600m+and 200m- around and Pass the Landslide areas also before to arrive at Khambachen.
Walking time: 5/6 hours (11km)/(635m+ and 200m-) around.
Overnight: at simple Lodge
Includes: Breakfast/lunch/Dinner
Day 07: Khambachen 4145m. (Rest day, Acclimatization day)
You have today rest day at Khambachen for acclimatization. On this day you can hike to Janu Himal Base Camp 4/5 hours 14km around or Nupche Pokhari 8/9 hours according to your interest with Packed Lunch and drinking water. Walking Hours have been calculated for both way up and down. Or explore 20th century Ghunsa Gompa (Monastery) and monks (Lamas). Besides enjoy the Sunrise and Sunset view.
Overnight: at simple Lodge
Includes: Breakfast/lunch/Dinner
Day 08: Khambachen 4145m-Lhonak 4792m.
The Trail leads you flat at first then ascend to Ramtang 4370m.At this place you can have lunch at a small monastery.Then walk continue to Lonak.Today you will overnight on the North Kanchenjunga Glacier.Via Lhonak you can see the Mera Peak and Nepal peak. In all direction,You will have a magnificent panorama.
Walking Time: 6 hrs (870m+ and 180m -) 10km around
Overnight: simple accommodation
Includes: Breakfast/lunch/Dinner
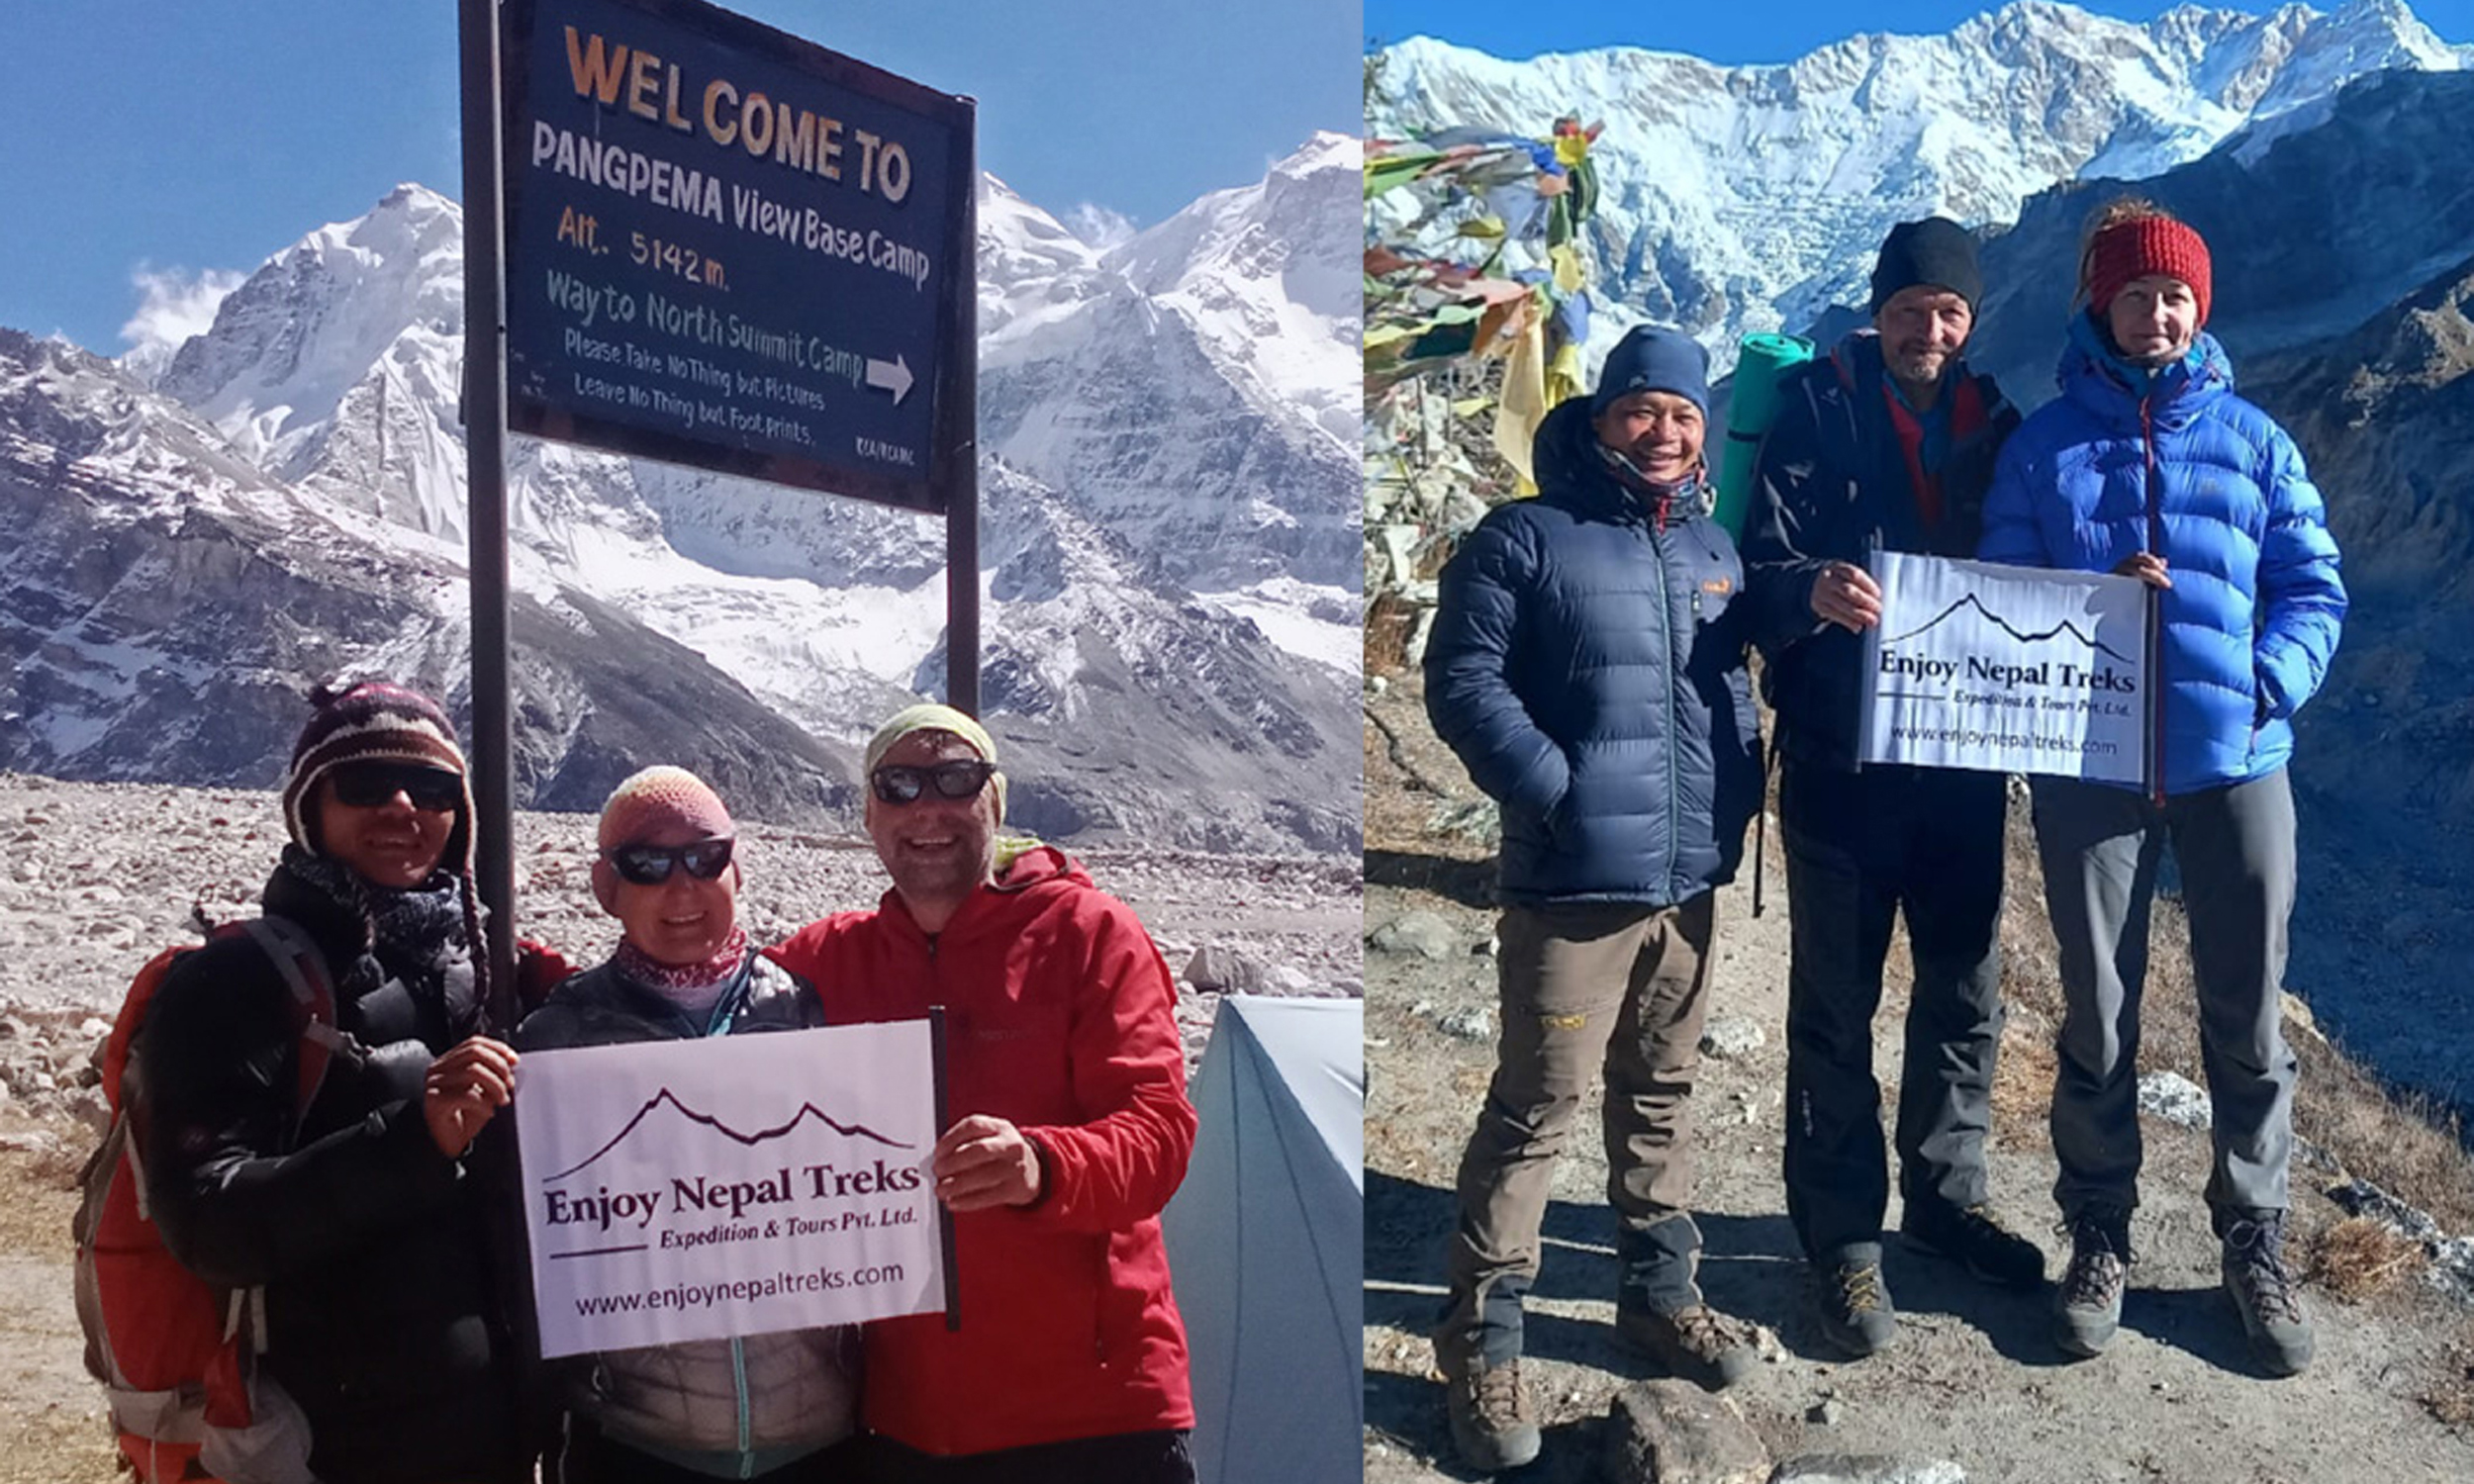
Day 09: Lhonak 4792m-North Kanchenjunga Base Camp 5140m-Lhonak
For the great panorama walk in the morning the rocky path,You walk up to northern Kanchenjunga base camp which is called Pang Pema either.You enjoy the view of word’s 3rd highest mt Kanchenjunga 8586m.After enjoying the view walk back to Lhonak.When you come back to Lhonak have a lunch and after lunch in addition you can do, if you interested to go western Kanchenjunga for the View of Yalung 8505m,Kangbachen 7902m 3-4hrs more walking time 200m+and 380m- Or you can rest after lunch decide yourself.
Note: At the Base Camp ,you get very cold so take warm clothes and enough Water, Biscuits.
Walking Time: 5-7 hrs (550m+ and 220m -)
Overnight: simple accommodation
Includes: Breakfast/lunch/Dinner
Day 10: Lhonak 4792m-Ghunsa 3415m
With Spectacular Photos retrace steps back to Ghunsa.On the way,it is seen rarely Blue sleep depends on luck. Again the path goes down to the valley through the Kambachen.Today you can have lunch at Kambachen then after Lunch descend to Ghunsa.You walk today slightly up and completely descend.
Walking Time: 8 hrs (300m+ and 1250m -)
Overnight: simple accommodation
Includes: Breakfast/lunch/Dinner
Day 11: Rest day at Ghunsa 3415m
Enjoy your day today at Ghunsa and relax your day before Nango La cross.
Day 12: Ghunsa 3415m to Nango La Camp 4746m.
You walk today 4 to 5 hours approx along the Ghunsa River This is a high-altitude alpine section usually done as part of the Kanchenjunga North/Base Camp approach and requires good acclimatization. While walking on the way, you will walk through the grazing Pastures.
Overnight at Tent and Meals at Tent with Tea/Coffee etc
Day 13: Nango La Camp 4746m. to Yangma Kola 3440m.
On this day, you will walk 6to 8 hours around to Yangmakola by crossing the Nango La. After crossing the Nango la descend to Yangmakola.You will walk through the beautiful Valley and Thick forests. You will Overnight at Tent.
Overnight at Tent and Meals at Tent with Tea/Coffee etc
Nango La Camp → Yangma Kola Trek
Distance & Time
Duration: 6–8 hours
Distance: ~12–15 km
Elevation loss: ↓ ~1,300 m (significant descent)
Trail Description
Early Descent from Nango La Camp
Start early due to weather conditions at high altitude
Descend from the remote high camp near Nango La Pass (4776m)
Trail is steep, rocky, and sometimes icy/snow-covered
Crossing Nango La Pass Area
If not crossed the previous day, you’ll pass near the Nango La (4776m) section
Expect:
Loose scree
Glacier remnants (seasonal)
Strong winds
Entering Remote Valley
After descending, terrain becomes:
Alpine meadows
Yak pastures
Remote wilderness with no settlements for several hours
Trail gradually improves but still rugged and isolated
Final Section to Yangma Kola
Trail joins a river valley leading to Yangma Kola (also called Yangma village)
Easier walking through:
Forest patches
Small cultivated areas near village
Arrival at Yangma Kola (3440m)
Small, traditional settlement
Basic teahouse or homestay accommodation
First real village after crossing the high pass
Important Notes
Challenging day: Long descent + technical sections
Navigation: Trail can be unclear—guide recommended
Weather: Can change rapidly near the pass
Supplies: Carry enough food and water (very remote stretch)
Day 14: Yangma Kola 3440m. to Olangchun Gola 3191m
You walk today 8 hours around during the day from Yangma kola to Olangchun Gola. Olangchun Gola was trading point between Tibet and Nepal where you Overnight Today.
Overnight at Tent and Meals at Tent with Tea/Coffee etc
Trail Description
The trail gradually descends along the Tamor River valley, making it a relatively easier trekking day.
You’ll walk through alpine meadows, yak pastures, and scattered seasonal settlements.
The route passes through Yangma village, a culturally rich settlement with Tibetan-influenced lifestyle.
Expect river crossings, stone trails, and occasional landslide-prone sections (especially after rain).
Highlights
Beautiful views of surrounding high Himalayan ridges
Traditional Tibetan-style houses and monasteries
Encounters with yak caravans and local herders
Peaceful and remote section of the Kanchenjunga North Base Camp route
Day 15: Rest day at Olangchun Gola 3191m
You will have rest day at Olangchun Gola. On this day explore the Olangchun Gola which is famous for trading Point between Tibet and Nepal.
Overnight at Tent and Meals at Tent with Tea/Coffee etc
A rest day at Olangchun Gola (3191 m) is an important and rewarding part of the trek, especially for acclimatization before heading toward higher elevations like Upper Langmale and Nango La.
Day 16: Olangchun Gola 3191m to Upper Langmale 3993m.
You will walk today 7 hours approx during the day. Overnight at Tent and Meals at Tent with Tea/Coffee etc
Trail Description
The trail gradually climbs out of Olangchun Gola along the Tamor River valley.
Pass through dense rhododendron and pine forest, with occasional open yak grazing areas.
Final section opens into a wide alpine valley with stunning mountain views.
Highlights
Traditional Tibetan-influenced village of Olangchun Gola
Remote wilderness with very few trekkers
Views of Kanchenjunga and surrounding peaks
Yak pastures and high-altitude landscape
Day 17: Upper Langmale 3993m.to Pass Camp 4747m.
Overnight at Tent and Meals at Tent with Tea/Coffee etc
This is a high-altitude, challenging trekking day in the remote Kanchenjunga region, moving toward the Nango La section.
Distance: ~8–10 km Duration: 6–8 hours Elevation gain: +750m approx. Difficulty: Hard (altitude + rough terrain)
Trail Description
The trail gradually climbs out of Upper Langmale through alpine meadows and yak pastures.
You’ll follow a remote, less-defined route with rocky paths and occasional moraine sections.
As you gain altitude, vegetation disappears, replaced by glacial terrain and barren landscapes.
The final section to Pass Camp (4747m) is steep and exposed, often with snow patches and strong winds.
Key Highlights
Stunning views of surrounding peaks near Kanchenjunga region
Remote wilderness with very few trekkers
Transition into high Himalayan pass environment
Important Notes
Acclimatization is critical – altitude gain is significant
Limited water sources – carry enough from Upper Langmale
Basic camping only at Pass Camp (no teahouses)
Expect cold temperatures and strong winds
Day 18: Pass Camp 4747m.to Chaurikharka 4595m.
Overnight at Tent and Meals at Tent with Tea/Coffee etc
Pass Camp (4747m) → Chaurikharka (4595m)
Duration: 5–7 hours Distance: 12 km (depending on route conditions) Difficulty: Challenging (high altitude + remote terrain)
Trail Overview
Leaving Pass Camp (4747m)—often near the high crossing area of Nango La Pass—you begin with a steep descent on rocky and sometimes icy terrain.
The trail initially drops over glacial moraine and loose scree
Expect technical sections, especially in early morning (ice/frost)
Gradual transition into alpine yak pastures
Final approach to Chaurikharka (4595m) is more gentle, with open highland views
Highlights
Stunning views of Kanchenjunga region
Remote wilderness with very few trekkers
Yak grazing fields and seasonal herder shelters
Possible sightings of Himalayan wildlife like blue sheep
Important Notes
Altitude: You’ll remain above 4500m most of the day → risk of altitude sickness still present
Water: Limited sources—carry enough or treat glacial streams
Navigation: Trail can be unclear; guide strongly recommended
Weather: Can change rapidly—snow and wind are common
Tip
Start early to cross any icy sections safely and reach Chaurikharka before afternoon weather shifts.
Day 19: Chaurikharka 4595m. to Thudam 3500m.
Overnight at Tent and Meals at Tent with Tea/Coffee etc
This is a long and demanding descent day as you leave the high alpine terrain and drop into lower valleys.
Walking Duration: 7–9 hours
Elevation Loss: ↓ ~1,095m
Trail Condition: Steep, rugged, remote trails with sections of loose rock and forest paths
Route Overview:
You begin early from Chaurikharka, descending gradually at first before tackling steeper downhill sections. The trail can be rough and less defined in parts, requiring careful navigation. As you descend, the barren high-altitude landscape slowly transitions into greener terrain with shrubs, forests, and flowing streams.
The route follows remote valleys with very limited settlements, emphasizing the wilderness experience of this section. Eventually, you reach Thudam, a culturally rich Rai village, marking a significant return to lower altitude habitation after several high passes.
Highlights:
Dramatic transition from alpine to lush landscapes
Remote and less-trodden trekking route
First major settlement after crossing high passes
Insight into local Rai culture and lifestyle
Challenges:
Long trekking hours
Continuous steep descent (stress on knees)
Basic facilities in Thudam
Tip:
Use trekking poles to reduce strain on your knees during the descent, and start early to comfortably reach Thudam before evening.
Day 20: Thudam 3500m. to Kharka 2877m.
Overnight at Tent and Meals at Tent with Tea/Coffee etc
This day involves a long descent through remote eastern Himalayan terrain, gradually leaving the high alpine zone and entering greener, lower valleys.
Trek Details:
Starting Point: Thudam (3500m)
Ending Point: Kharka (2877m)
Duration: 6–7 hours
Difficulty: Moderate (mainly downhill, but long walking hours)
Trail Description:
The trail descends steadily from Thudam, following forested ridges and river valleys. You’ll pass through dense rhododendron and pine forests, with occasional clearings offering views of surrounding hills.
The route is peaceful and less trekked, giving a true wilderness experience. As you lose altitude, the air becomes warmer and more humid, and vegetation becomes thicker.
Highlights:
Beautiful forest trails with rich biodiversity
Gradual transition from alpine to subtropical landscape
Quiet and remote trekking experience
Possible encounters with local wildlife and birdlife
Accommodation:
Basic teahouse or simple lodge at Kharka
Camping may be required depending on availability
Tips:
Carry enough water and snacks, as facilities are limited
Trekking poles help reduce strain on long descents
Be cautious on slippery forest trails, especially after rain
Day 21: Kharka 2877m.to Chyamtang 2229m.
Overnight at Tent and Meals at Tent with Tea/Coffee etc
Kharka (2877m) → Chyamtang (2229m)
Duration: 5–6 hours
Distance: ~10–12 km (approx.)
Elevation Loss: ↓ 648m
Difficulty: Moderate (mostly downhill, some ups and downs)
Trail Description
This is a pleasant descending day as you leave the higher alpine zone and move into a warmer, more settled valley:
The trail follows the Arun River valley, gradually descending through forests and terraced fields.
You’ll pass small Rai and Limbu villages, offering cultural interaction opportunities.
Sections of the trail can be narrow and slightly exposed, but generally manageable.
Expect lush greenery, waterfalls, and a noticeable increase in vegetation compared to higher elevations.
Highlights
Transition from alpine to subtropical landscape
Traditional eastern Nepal village life
Scenic river valley walking
Tips
Trekking poles are helpful for the long descent.
It can get warmer—carry enough water and lighter layers.
Watch your footing on downhill sections to avoid knee strain.
Day 22: Chyamtang 2229m.to Lomi Village
Overnight at Tent and Meals at Tent with Tea/Coffee etc
The route from Chyamtang (2,229 m) to Lomi Village (Lomi/Lomi area in eastern Nepal) is a remote Himalayan connecting trail that passes through lower valleys and mixed descent–ascent terrain in the Kanchenjunga–Makalu corridor region.
Altitude (Chyamtang → Lomi Village)
Chyamtang: 2,229 m
Lomi Village (approx.): ~1,800 m – 2,100 m (varies by exact settlement in the Lomi area)
Net change: generally descending ~100–400 m, with small ups and downs along the trail
The route is not a straight descent—expect rolling terrain through forested hills and river valleys.
Chyamtang → intermediate villages → Lomi area
Start: Chyamtang (2,229 m)
Trail descends through:
Small Sherpa/Tamang settlements
Terraced farmland
Mixed pine–rhododendron forest
Cross small suspension bridges over tributary streams
Gradual approach toward lower valley settlements
End: Lomi Village area (~1,900 m avg)
Duration: 5–7 hours (depending on pace & stops) Distance: 14 km (approx., varies by exact trail alignment)
What the trail is like
Mostly forest + village trail
Several steep downhill sections
Occasional short climbs after river crossings
Rich Rai/Sherpa rural culture
Less exposed than higher Himalayan passes (warmer, greener)
Important notes
Water sources available in villages and streams (treat before drinking)
Tea houses are basic or limited depending on exact Lomi location
Trail conditions can change during monsoon (slippery slopes)
Good acclimatization is already achieved since you are descending from 2,229 m
Day 23: Lomi Village to Hongon 2332m.
Overnight at Tent and Meals at Tent with Tea/Coffee etc
Lomi Village (likely Limi/Lomi in your itinerary context) is part of a high Himalayan trekking zone in eastern Nepal-style remote trails.
The next settlements in this type of route typically descend from ~3200m+ to ~2300m range, passing through mixed forest and small Rai/Limbu/Tibetan-influenced villages.
Trekking profile (Lomi → Hongon 2332m)
Elevation change: usually a gradual descent (good for recovery)
Trail type: forest + ridge + river valley sections
Duration: ~5–7 hours trekking (depending on exact trail condition)
Difficulty: moderate (less technical, but remote)
Typical trail characteristics
Rhododendron and pine forests at lower sections
Small yak/herder shelters or seasonal kharkas
Occasional suspension bridges over tributaries
Temperature becomes warmer compared to Lomi
Day 24: Hongon 2332m. to Bakim Kharka/High Camp 3020m
Overnight at Tent and Meals at Tent with Tea/Coffee etc
The trek from Hongon begins with a steady climb through dense rhododendron and pine forests, offering a peaceful and shaded start. As you ascend, the vegetation gradually thins, and the trail opens into more rugged terrain.
You’ll pass through:
Small yak grazing pastures (kharkas)
Occasional shepherd huts
Scenic ridges with views of surrounding hills and distant snow peaks
The final section toward Baim Kharka / High Camp (3020m) becomes steeper, with a more alpine environment and cooler temperatures.
Bakim Kharka / High Camp (3020m)
A basic grazing area with limited facilities
Usually tented camping (rare or no teahouses)
Stunning sunset and sunrise views over the Himalayan range
Important acclimatization stop before higher passes
Important Notes
Carry enough water and snacks—no reliable shops on the way
Weather can change quickly; expect fog, wind, or cold at higher elevation
Watch for altitude gain—take it slow and steady
Day 25: Bakim Kharka/High Camp 3020m to Molun Pokhari 3954m.
Overnight at Tent and Meals at Tent with Tea/Coffee etc
Route Overview
Starting Point: Bakim Kharka / High Camp – 3020m
Ending Point: Molun Pokhari – 3954m
Altitude Gain: +934m
Duration: 6–8 hours
Difficulty: Moderate to Challenging
Trail Description
You begin with a gradual climb through alpine forest and rhododendron zones, but the trail soon becomes steeper as you gain elevation.
The path follows remote ridgelines and yak grazing areas
You’ll pass through open meadows (kharkas) with wide Himalayan views
As you climb higher, vegetation becomes sparse and terrain turns rocky
Final approach to Molun Pokhari is often windy and exposed
Highlights
Stunning views of Makalu region peaks and surrounding Himalayan ranges
Peaceful high-altitude landscapes with very few trekkers
Molun Pokhari (sacred alpine lake) – culturally important and visually striking
Things to Consider
Big altitude gain: Risk of AMS (Acute Mountain Sickness), ascend slowly
Limited water sources: Carry enough water from High Camp
Weather exposure: Afternoon winds and sudden weather changes are common
Basic or no accommodation: Camping may be required depending on itinerary
Accommodation
Molun Pokhari: Mostly camping area
Some seasonal shepherd huts may be available, but not reliable
Day 26: Molun Pokhari 3954m. to Dhunge Kharka 2980m.
Overnight at Tent and Meals at Tent with Tea/Coffee etc
Overview:
Starting Point: Molun Pokhari (3954m)
Ending Point: Dhunge Kharka (2980m)
Duration: 5–7 hours
Distance: ~10–14 km (approx.)
Elevation Loss: ↓ ~974m
Difficulty: Moderate (long descent, some steep sections)
Trail Description
Leaving Molun Pokhari, the trail begins with a gradual descent from the alpine lake area. The surroundings are open and scenic, often offering wide views of rolling high hills and distant Himalayan peaks.
The first section can include rocky and grassy terrain, sometimes muddy depending on the season.
As you descend further, the landscape transitions into rhododendron and mixed forests.
Expect steeper downhill sections, which can be tough on knees—trekking poles are helpful.
The trail may pass through seasonal grazing areas (kharkas) with occasional shepherd huts.
Closer to Dhunge Kharka, the terrain becomes more forested and sheltered, with a more defined trail.
Highlights
Peaceful alpine lake at Molun Pokhari
Changing vegetation zones (alpine → forest)
Remote and less crowded trail
Traditional pastureland lifestyle
Day 27: Dhunge Kharka 2980m. to Khola Kharka
Overnight at Tent and Meals at Tent with Tea/Coffee etc
Difficulty: Moderate (mostly descending with some forest trails)
Trail Description
The trail from Dhunge Kharka to Khola Kharka is mostly downhill through dense forest, making it easier on altitude but still requiring careful footing:
Descend through rhododendron and bamboo forests
Pass small streams and rocky sections
Occasional wildlife sightings (langurs, birds)
Trail can be misty and damp, especially in the morning
Things to Consider
Trail can be slippery, especially after rain
Watch for leeches in warmer months
Limited settlements – carry enough water/snacks
Khola Kharka
Small grazing area / seasonal campsite
Basic camping spot; teahouse availability may be limited or seasonal
Peaceful forest setting near a stream (“Khola” = river)
Day 28: Khola Kharka to Cave Camp 3900m.
Overnight at Tent and Meals at Tent with Tea/Coffee etc
Overview
Starting Point: Khola Kharka (~3000m)
Ending Point: Cave Camp (~3900m)
Elevation Gain: +900m
Duration: 6–8 hours
Difficulty: Moderate to Difficult
Accommodation: Basic camping (no teahouses)
Trail Description
The trail from Khola Kharka to Cave Camp is steep, wild, and less-defined, passing through dense forests before opening into alpine terrain:
Initial Section:
You begin with a gradual ascent through rhododendron and bamboo forest, often with narrow and slippery trails.
Mid Section:
The route becomes steeper as you climb along ridgelines and traverse remote hillsides. Expect limited water sources, so carry enough.
Final Ascent to Cave Camp:
The last stretch is more exposed and rugged, leading to a natural cave area used as a campsite by trekkers and herders.
Cave Camp (3900m)
A basic campsite inside/near a rock cave, offering natural shelter
No permanent lodges or facilities
Stunning views of surrounding hills and high Himalayan ridges
Cold and windy at night ❄️
Important Notes
This section is remote and rarely trekked — a guide is highly recommended
Be prepared for navigation challenges
Watch for altitude gain (900m in a day) — go slow and stay hydrated
Weather can change quickly; fog is common
Day 29: Cave Camp 3900m. to Kalo Pokhari 4100m
Overnight at Tent and Meals at Tent with Tea/Coffee etc
The trail gradually ascends from Cave Camp, following alpine ridges and open yak grazing areas.
You’ll pass through rocky terrain and high-altitude meadows, with increasingly sparse vegetation.
The path can be narrow and exposed in some sections, especially near ridgelines.
As you approach Kalo Pokhari, the landscape becomes more barren and windswept.
Highlights
Stunning views of surrounding Himalayan peaks (Makalu region landscapes).
Peaceful high-altitude wilderness with very few settlements.
Arrival at Kalo Pokhari (Black Lake) – a sacred alpine lake with cultural significance.
Things to Consider
Altitude gain is moderate, but you are already above 3900m → watch for AMS symptoms.
Weather can change quickly — expect strong winds and cold temperatures.
Limited facilities — carry enough water and snacks.
Overnight
Basic camping or very simple seasonal shelter (depending on trekking season and route logistics).
Day 30: Kalo Pokhari 4100m to Grazing Kharka 3960m
Overnight at Tent and Meals at Tent with Tea/Coffee etc
This section is a relatively short but scenic descent through high alpine terrain, often used as a transition day after crossing higher passes.
Trek Overview
Starting Point: Kalo Pokhari (4100m)
Ending Point: Grazing Kharka (3960m)
Duration: 5 hours
Distance: ~6–8 km
Elevation Loss: ↓ 140m
Trail Description
From Kalo Pokhari, the trail gently descends through open yak pastures and rugged alpine landscapes. The route is less steep compared to previous high-pass sections, making it a more relaxed trekking day.
You’ll walk along:
Rocky paths and grassy slopes
Occasional ridgelines with mountain views
Seasonal grazing areas used by local herders
As you approach Grazing Kharka, the terrain becomes greener, with wider pastureland and potential temporary shelters used during grazing seasons.
Accommodation & Facilities
Basic camping or simple shepherd huts (seasonal)
Limited or no permanent teahouses
Water sources available (always purify before drinking)
Things to Note
Weather can change quickly at this altitude
Trails may be faint—guide recommended
Watch for livestock and muddy sections in wet conditions
Highlights
Peaceful alpine environment
Fewer trekkers, very remote feel
Beautiful views of surrounding Himalayan ranges
Day 31: Grazing Kharka 3960m to Yangla Kharka 3557m.
Overnight at Tent and Meals at Tent with Tea/Coffee etc
Grazing Kharka (3960 m) → Yangla Kharka (3557 m)
Elevation loss: ↓ 403 m
Duration: 6–7 hours
Distance: 12 km (approx.)
Trail type: Mostly descent through alpine terrain, forests, and pasture land
Trail Overview
The trek from Grazing Kharka to Yangla Kharka is a gradual descent after high-altitude sections. The trail typically:
Starts with open alpine meadows and yak grazing areas
Descends into rhododendron and pine forests
Passes small streams and possibly seasonal herder camps
Becomes more comfortable walking compared to previous high passes
Difficulty
Moderate (easier than previous days)
Less risk of altitude issues as you descend
Highlights
Wide mountain views in the early part of the day
Peaceful forest walking
Rich grazing lands and traditional kharka landscape
Notes
Trail can be muddy or slippery in wet conditions
Watch for livestock and unclear junctions—local guidance helps
Good day for recovery after higher elevation trekking
Day 32: Yangla Kharka 3557m. to Langmale Kharka 4400m.
Overnight at Tent and Meals at Tent with Tea/Coffee etc
Yangla Kharka (3557m) ➝ Langmale Kharka (4400m)
Elevation Gain: +843 meters Walking Duration: 5–7 hours Difficulty: Moderate to challenging (due to altitude gain)
Trail Overview
The trail gradually ascends along the upper valley, following the river upstream.
You’ll pass through open alpine meadows, scattered yak pastures, and glacial terrain.
Vegetation becomes sparse as you gain altitude, with more rocky and exposed landscapes.
The route offers stunning views of surrounding Himalayan peaks, especially nearing Langmale.
Key Notes
Altitude gain is significant, so walk slowly and take regular breaks.
Stay hydrated and monitor for symptoms of Acute Mountain Sickness (AMS).
Weather can change quickly—carry warm layers and wind protection.
Arrival at Langmale Kharka (4400m)
A wide grazing pasture surrounded by mountains.
Basic camping area (limited or no permanent teahouses depending on route/season).
Excellent acclimatization stop before heading higher (e.g., towards passes or base camps).
Day 33: Langmale Kharka 4400m.
Overnight at Tent and Meals at Tent with Tea/Coffee etc
Rest day today at Langmale Kharka, Enjoy your day.
Day 34: Langmale Kharka 4400m. to Makalu Base Camp 4870m
Overnight at Tent and Meals at Tent with Tea/Coffee etc
Langmale Kharka (4400m) → Makalu Base Camp (4870m)
This is the final and most dramatic section of the approach to the upper Makalu region inside the Makalu Barun National Park, leading to Makalu Base Camp.
Route Overview
Start: Langmale Kharka (4400m)
End: Makalu Base Camp (4870m)
Altitude gain: ~470m
Typical duration: 5–7 hours (depending on pace and conditions)
Difficulty: Moderate to challenging (high altitude, exposed terrain)
Trail Description
From Langmale Kharka, the trail gradually climbs through a wide glacial valley with increasing alpine exposure.
Key sections:
Langmale Kharka → Shershong area
Gentle to moderate ascent
Open yak grazing terrain
Increasing views of Makalu (8463m) and surrounding glaciers
Shershong (Shelter area)
Important stopover point for acclimatization
Flat, windswept valley floor
Often used for rest or camping in bad weather
Shershong → Makalu Base Camp
Short but steeper push
Moraine and rocky glacial terrain
Final approach along the Barun Glacier basin
Trail Conditions
High-altitude alpine desert
Cold winds common even in trekking season
Possible snow patches depending on month
Limited water sources in final section (seasonal streams)
Important Notes
This is the last major ascent before Makalu Base Camp
Weather can change quickly—visibility may drop near the glacier
Proper acclimatization at Langmale or Shershong is highly recommended
No facilities at Makalu Base Camp beyond basic tents (seasonal camps)
Day 35: Makalu Base Camp 4870m
Overnight at Tent and Meals at Tent with Tea/Coffee etc
Rest day at Makalu Base Camp
Day 36: Makalu Base Camp 4870m to Swiss Base Camp 5150m
Overnight at Tent and Meals at Tent with Tea/Coffee etc
Makalu Base Camp (4870m) → Swiss Base Camp (5150m)
This is a short but high-altitude ascent within the Makalu region, moving from Makalu Base Camp at 4870m up to Swiss Base Camp (5150m).
Elevation gain
+280 meters ascent
Steady climb in thinning air above 4800m
Trek details
Duration: 5-6 hours (depending on pace and acclimatization)
Terrain: Rocky alpine trail, moraine ridges, glacial valley sections
Difficulty: Moderate to challenging due to altitude, not distance
What to expect
Increasing exposure to glacier landscapes
Views of surrounding Makalu massif ridges
Colder temperatures and stronger winds than Makalu Base Camp
Less vegetation, more barren high-altitude terrain
Important tips
Go slow—this is high-altitude trekking above 5000m
Hydrate frequently and avoid rushing
Watch for signs of altitude sickness (headache, nausea, dizziness)
Weather can change quickly—carry warm layers and wind protection
Day 37: Swiss Base Camp 5150m
Overnight at Tent and Meals at Tent with Tea/Coffee etc
Rest Day at Swiss Base Camp
Day 38: Swiss Base Camp 5150m to Sherpani Col Base Camp 5700m
Overnight at Tent and Meals at Tent with Tea/Coffee etc
From Swiss Base Camp (5150m) to Sherpani Col Base Camp (5700m) is a high-altitude alpine ascent along the Makalu–Barun / Everest west ridge approach routes.
Route Overview
Start: Swiss Base Camp
End: Sherpani Col Base Camp
Altitude gain: ~550 meters
Time: ~5–7 hours (depending on snow, rope fixing, and acclimatization)
Trail Conditions
Mostly glacier travel and moraine walking
Possible crevasse zones and ice slopes
Often requires fixed ropes and technical navigation
Weather and snow conditions strongly affect pace
Difficulty
Very high altitude (5500m+)
Physically demanding due to thin air and cold exposure
Usually part of the Makalu–Sherpani Col–West Col–Baruntse traverse route
Day 39: Sherpani Col Base Camp 5700m to Baruntse High Camp 6100m
Overnight at Tent and Meals at Tent with Tea/Coffee etc
Sherpani Col Base Camp (5700m) → Baruntse High Camp (6100m)
This is a high-altitude, technical transition segment in the Makalu–Baruntse–Himalaya traverse area, moving from the Sherpani Col approach zone toward the south side of Baruntse.
Route Overview
Start: Sherpani Col Base Camp (5700m)
End: Baruntse High Camp (6100m)
Elevation gain: ~400m
Terrain: Mixed glacier travel, steep snow slopes, crevassed sections, and possible fixed-line sections depending on conditions
What to Expect
Glacier navigation: You’ll typically traverse broken glacier terrain with hidden crevasses.
Steep ascent sections: Short but sustained steep snow/ice climbs.
Exposure: High exposure zones with potential wind and sudden weather changes.
Technical difficulty: Moderate to high depending on snow conditions and route fixing.
Timing
Duration: ~5 to 7 hours (highly condition-dependent)
Early starts are essential due to afternoon weather instability.
Key Challenges
Thin air above 6000m (reduced endurance)
Crevasse risk and route-finding complexity
Cold winds across the Barun Glacier system
Trekking Note
This section is often part of the Makalu–Baruntse crossing route, and is usually done with experienced high-altitude guides due to objective hazards.
Day 40: Baruntse High Camp 6100m to Honku Basin
Overnight at Tent and Meals at Tent with Tea/Coffee etc
Baruntse High Camp (6100m) → Honku Basin (approx. 5200–5400m depending on campsite) is a serious high-altitude descent crossing glaciated terrain in the Makalu–Barun region.
Route Overview
This section typically involves:
Descending from Baruntse High Camp (6100m) on the south/east side of Baruntse
Moving across broken glacier and moraine terrain
Traversing toward the lower, more open Honku Basin, a vast glacial valley system south of the Hunku/Honku glacier area
Key Terrain Sections
High Camp → Glacier Descent (6100m → ~5800m)
Steep glacier descent at the start
Rope work often required (fixed lines depending on conditions)
Crevasse-prone zones, especially early morning icy sections
Central Glacier Traverse (~5800m → 5400m)
Mixed snow and moraine
Navigation through séracs and debris fields
Gradual loss of elevation but still technical
Entry into Honku Basin (~5400m → 5200m)
Terrain opens up into wider valley
More stable camping zones appear
Often used as a transitional campsite before Sherpani Col / Amphu Lapcha approaches
Time Estimate
5 to 6 hours depending on:
Snow conditions
Load (expedition vs trekking)
Rope installation / route finding
Difficulty
Very high
Requires:
Glacier travel experience
Crampons + rope skills
Crevasse rescue knowledge (strongly recommended)
Weather windows are critical (best early morning movement)
Honku Basin Notes
Broad glacial amphitheatre south of Baruntse–Makalu massif
Common staging area for:
Sherpani Col crossings
Amphu Lapcha approach
Windy but less steep than surrounding sections
Day 41: Honku Basin to Amphu Lapchha Base Camp 5400m
Overnight at Tent and Meals at Tent with Tea/Coffee etc
Honku Basin → Amphu Lapcha Base Camp (5400m)
Honku Basin → Amphu Lapcha Base Camp
This is a high-altitude alpine traverse linking the remote Honku valley to the approach of the Amphu Lapcha pass.
Route overview
Start from Honku Basin (remote glacial valley with multiple lakes and moraine terrain)
Gradually move east/southeast across:
rocky moraine ridges
glacial streams
loose scree sections
Approach the Amphu Lapcha Base Camp (around 5400m) below the west face of the pass
Terrain & difficulty
Mostly high-altitude glacier/moraine walking
Some route-finding sections (no clear trail in places)
Requires steady pacing due to altitude gain and thin air
Snow/ice possible depending on season
Trek duration
Typically 4–6 hours depending on conditions and load
Key notes
Very exposed alpine environment with minimal shelter
Weather can change quickly (wind and snowfall common)
Proper acclimatization from Honku Basin is essential before pushing to base camp
Destination context
Amphu Lapcha Pass is one of the most technical high passes in the Everest region, and the base camp serves as the final staging point before the climb/crossing attempt.
Day 42: Amphu Lapchha Base Camp 5400m
Overnight at Tent and Meals at Tent with Tea/Coffee etc
Rest day at Amphu Lapchha Base Camp
Day 43: Amphu Lapchha Base Camp 5400m to Chhukung 4730m.
Overnight at Tent or lodge as per your need and Meals , Tea/Coffee etc
Amphu Lapcha Base Camp (5400m) → Chhukung (4730m)
Elevation change: ↓ approx. 670m descent
Route type: High alpine glacier + technical pass descent + valley trail
Route overview
From Amphu Lapcha Base Camp, the descent begins on glaciated and rocky terrain, typically involving fixed ropes and careful movement over ice and loose moraine. After crossing the Amphu Lapcha Pass section, the route drops steeply into the Honku / Imja valley system, eventually merging into more defined trekking trails.
Once you clear the technical section, the terrain gradually becomes easier as you approach the Imja valley and finally reach Chhukung (4730m)—a small trekking hub below Island Peak and the Lhotse-Nuptse wall.
Key notes
Highly technical descent at the start (ice, steep slopes, ropework)
Conditions depend heavily on snow/ice stability
After mid-section, it becomes a normal trekking trail
Often takes 10–12 hours depending on conditions and group speed
Day 44: Chhukung 4730m. to Lobuche 4930m Via Kongmala
Meals,Tea, Coffee and Accommodation at Lodge
Chhukung (4730m) → Lobuche (4930m) via Kongma La (≈5535m)
This is one of the toughest and most remote crossings in the Everest region.
Route Overview
Start: Chhukung (4730m)
Pass: Kongma La (~5535m)
End: Lobuche (4930m)
Distance: ~12–15 km (depending on line taken)
Time: 8–11 hours
Type: High alpine pass crossing (no villages in between)
Elevation Profile
Chhukung → Kongma La: +~800 m steep ascent
Kongma La → Lobuche: -~600 m long descent
Total challenge comes from altitude + terrain, not distance
Key Section Breakdown
Chhukung → Kongma La Base (2–3 hrs)
Gradual start on moraine and rocky trail
Route is not always clearly marked
Cold and windy early morning common
Final ascent to Kongma La (2–3 hrs)
Very steep scree and loose rock
Navigation can be tricky in snow/fog
Often frozen early season (crampons useful)
Kongma La → Niyang Kharka / Khumbu Glacier (2–3 hrs)
Good acclimatization (must already be well adapted above 4500m)
Clear weather window
Trekking experience on steep alpine terrain
Early start (5–6 AM recommended)
Important Notes
No lodges or tea houses between Chhukung and Lobuche
Risk factors:
Whiteouts on Kongma La
Loose scree + glacier ice
Altitude headache / AMS risk
Strongly avoid solo crossing in poor visibility
Day 45: Lobuche-Gorekshep 5140m.After lunch day hike to Everest base Camp 5364m.7hrs.
Gorekshep is about 6 km far away from Lobuche.It takes 3hrs around to reach Gorekshep from Lobuche.After having lunch you hike to Everest Base camp 5364meters and explore the gigantic view of khumbu glacier , Everest Base Camp.finally same way come back to Gorekshep.
Meals: Breakfast/Lunch/Dinner
Accommodation: At lodge
Ascent:650 meters
walking distance: 6-7 hrs. /12 km
Day 46: Gorekshep-Kalapathar 5550m-Dzongla 5420m.6hrs(Lodge)
get up early in the morning ,prepare well your equipment like warm gloves, jackets, woolen hat, light,shoes, socks, some chocolates, biscuit and water . you climb to Kalapathar (black stone) at 4:30 am.It takes up and down to 4 hrs.Kalapathar is famous for mt everest massive panorama view with an amazing sunrise.Enjoy the rounded mountains view and come back to Gorekshep.After having breakfast walk down to Dzongla same way through the Lobuche.
Meals: Breakfast/Lunch/Dinner
Accommodation: At lodge
Ascent: 400 meters
Descent :650 meters
walking distance: 6-7 hrs.
Day 47: Dzongla to Thangnak 4700m
Meals,Tea, Coffee and Accommodation at Lodge
The trek from Dzongla (4,830m) to Thangnak / Dragnag (≈4,700m) is typically done via the Cho La Pass (5,420m) and is one of the most demanding sections of the Everest Three Passes / Gokyo–EBC circuit.
Dzongla → Thangnak (via Cho La Pass)
Route Overview
You start from Dzongla, climb up to Cho La Pass, then descend into the Gokyo valley and reach Thangnak.
Key Sections
Dzongla → Cho La Pass (Ascent)
Steep rocky trail + possible glacier crossing
Early morning start recommended
Snow/ice often present even in trekking season
Physically demanding climb (~3–5 hours)
Cho La Pass → Dragnag (Descent)
Glacier section (crevasses possible depending on season)
Technical slippery descent
Careful navigation required (~2–3 hours)
Dragnag → Thangnak
Short walk across moraine terrain
Gradual and easier section (~30–60 min)
Total Time
8–10 hours (depending on weather & snow conditions)
Difficulty
Very hard
High altitude + glacier + steep pass crossing
Requires good acclimatization and stable weather
Important Tips
Start before sunrise (snow is firmer early morning)
Crampons may be needed in icy conditions
Avoid crossing in bad weather (whiteout risk on Cho La)
Carry trekking poles for descent stability
Day 48: Thangnak 4700m to Gokyo 4750m.
Meals,Tea, Coffee and Accommodation at Lodge
This is a short but spectacular trekking section in the Gokyo Valley, often done in 2–4 hours.
The route starts from Thangnak, crossing rough glacial terrain.
You traverse the Ngozumpa Glacier, the largest glacier in Nepal—rocky, uneven, and sometimes confusing.
Cairns (stone markers) guide the way, but visibility can be tricky in bad weather.
After crossing the glacier, a gradual ascent leads to the beautiful turquoise lakes of Gokyo.
Difficulty & Tips
Moderate difficulty due to glacier crossing (not technical, but requires attention).
Start early to avoid strong winds.
Trekking poles help on unstable rocks.
Stay hydrated—altitude is still high.
Highlights
Crossing the Ngozumpa Glacier
First views of Gokyo Lakes
Stunning backdrop of peaks like Cho Oyu
Day 49: Gokyo 4750m. to Gokyo Ri 5357 Hiking
Meals,Tea, Coffee and Accommodation at Lodge
Hiking from Gokyo (4,750 m) to Gokyo Ri (5,357 m) is one of the best short climbs in the Everest region, famous for panoramic views of Everest, Cho Oyu, and the Gokyo Lakes.
Route Overview
Start point: Gokyo village (by the 3rd Gokyo Lake)
End point: Gokyo Ri summit
Elevation gain: ~600 m
Distance: ~1.5–2 km (one way)
Time required:
Ascent: 2–4 hours
Descent: 1.5–2 hours
Trail Description
The trail begins just north of Gokyo village and climbs steeply right from the start:
Initial steep ascent
Rocky zigzag trail above the lake
Gradual but constant climb
Mid-section ridge
Wider views of Gokyo Valley and Ngozumpa Glacier
Good rest spots
Final push to summit
Steeper and more exposed
Thin air makes it challenging
What You’ll See at the Top
From the summit of Gokyo Ri, you get one of the best Himalayan panoramas:
Mount Everest (8,848 m)
Cho Oyu (8,188 m)
Lhotse
Makalu
Entire Gokyo Lakes system
Ngozumpa Glacier
Best Time to Hike
Early morning (sunrise): Most लोकप्रिय and rewarding
Afternoon: Possible, but clouds often block views
Difficulty & Tips
Difficulty: Moderate to strenuous (due to altitude)
Go slow and steady – altitude is the main challenge
Carry:
Water (no shops on the way)
Warm layers (very cold at top)
Headlamp if starting early
Watch for Altitude Sickness (AMS) symptoms
Pro Tips
Do it as an acclimatization hike before crossing Cho La Pass
Sunrise hike = clearer skies + fewer clouds
Wind can be strong at the summit—bring gloves & hat
Day 50: Gokyo 4750m. to Lungden 4500m
Meals,Tea, Coffee and Accommodation at Lodge
This is one of the most scenic and adventurous days in the Everest region, crossing a high pass with stunning Himalayan views.


Leave a Reply